A game for Aberdeen music Hall
Initial Research
During our first team meeting, since we had no prior knowledge about the Aberdeen Music Hall, we shared our thoughts on the brief and the knowledge we had gathered, including things we hadn't considered, such as screen size and placement, as we hadn't personally visited Aberdeen Music Hall. Therefore, we made temporary notes of our questions. I discussed implementation approaches with another programmer and suggested using hardware installations like sensors and cameras for the project. If he had expertise in this area, it would have made our work easier since relying on just one person would be challenging. Unfortunately, he wasn't familiar with those techniques; he was more skilled in gameplay-related content. I proposed an alternative approach, using network-based methods to enable interaction between players and the game. He had previously worked on a demo for a multiplayer game, so he had some understanding and experience in that field. Thus, I decided to prioritize the use of network methods for the project. Our designer quickly presented us with some rough game concepts and offered different solutions for further discussion on development goals and approaches after we visited the venue.
Before our first visit to Aberdeen Music Hall, I compiled a list of questions that I, as a programmer, needed to address:
- "What is the target development system? Windows, macOS, or another system?"
- "Do we have access to the camera? Can I obtain permission to use or collect data from the camera?"
- "How is the existing project running on the screens at Aberdeen?"
- "What are the screen sizes and resolution?"
During our visit to Aberdeen Music Hall, we met our client, Mark. Our designer had a brief discussion with him about our current ideas, and Mark expressed his satisfaction with the design while also providing some constructive suggestions, such as adding a PvP mode. After the initial conversation, we gathered around the large screen located in the center of the entrance and started discussing it. As others asked their questions, I also received answers to mine: Mark is not a technical person, so some technical details would need to be discussed with their technical team. However, he could confirm the screen's resolution ratio, and we could obtain permission to use the camera at the Aberdeen entrance for target recognition. However, we couldn't add buttons or other hardware devices at the entrance. For the project ran on the screen, previously, the content displayed on it varied, including web pages, pre-made videos, and looping visuals generated by algorithms using Unity. Mark also mentioned that there was a project where QR codes were placed on the screen for people to scan. These were valuable pieces of information that narrowed down our development scope. Our designer provided a specific solution: "Let's use QR codes to enable player interaction with the game." Before we left, I also noted a few other aspects: many visitors here were older and might not be familiar with games, so I should simplify the controls as much as possible. Additionally, the entrance area was not spacious, and when there was high foot traffic, people tended to walk quickly. Therefore, we needed to make our game's QR code eye-catching and easy to scan, to avoid causing any hazards or making people stop for too long. After scanning the code, they should be able to safely play the game in a corner.

The entrance is not spacious, but the space behind the door is sufficient for visitors to play game safely.
After our designer specified the direction of using QR codes for player interaction with the game, The another programmer and I discussed the division of tasks. He took charge of the frontend gameplay, while I focused on backend development related to network communication. To meet our requirements, I conducted extensive research and learning, and came up with the following two ideas to establish our development process.
-
Use the smartphone as a controller to operate the game, eliminating the need for additional physical devices to play.
-
It would be ideal if the game doesn't require additional downloadable resources, which means we cannot make player download installation packages after scanning QR codes.
Firstly, the first point raises some questions: to remotely control the game using a smartphone, we need to establish communication and message transmission between the phone and the screen. This requires knowledge of networking, and we also need to ensure cross-platform compatibility. Therefore, I would need to develop a separate client program that runs on the smartphone. This client program will be responsible for sending messages to the game to control the game.
The second point introduces another issue: after scanning the QR code, we should avoid redirecting the phone to a download page for players to download the pre-build game program. This is to prevent potential issues such as insufficient memory on the players' phones or occupying their phone storage. This means that the program we use to control the computer cannot be directly developed as a game application.
Therefore, my development goals are now clear:
- Our game, apart from the gameplay section, requires a server-side component and related code to handle the data sent from the client.
- We need to develop an additional client program that allows players to run it on their smartphones and send data to the server, enabling them to control the game using their phones.
- Create QR codes that allow players to scan them and access the client program.
For the first point, I considered using Unity's network module or other network plugins such as UNET to implement server scripts and code.
Regarding the second point, after careful consideration and investigation, I have decided to deploy the client program on a webpage. This allows players to connect to the server without downloading additional resources, simply by opening the webpage. Unity supports exporting projects as WebGL builds. I will deploy the WebGL build, which contains the client program, onto a webpage to establish communication with the server.
As for the third point, considering the need for visual effects in the game and our lack of experience in dynamically generating styled QR codes, I have decided to use tools to generate styled QR codes and incorporate them into the game. Once players scan the QR codes, they will be redirected to the webpage where the client program is deployed. Therefore, the QR codes need to contain the webpage address.
After clarifying these three development goals, feasibility analysis is necessary. Initially, I used the UNET framework in Unity to build the server. UNET is a Unity-provided transport plugin based on UDP sockets. However, after exporting the WebGL build, I encountered issues with the communication socket not working properly. Upon reviewing the documentation, I discovered that UDP ports cannot be opened on a webpage. The default network interface in the WebGL player is the WebSocketNetworkInterface, which encapsulates a TCP socket using the WebSocket protocol. Since a TCP socket can only connect to another TCP socket, and the same applies to UDP, I decided to no longer use the Unity Transport Plugin. Instead, I opted for another third-party plugin, NativeSocket, to handle communication on the client side. For the server, I used the System.Net.Sockets library, which is built into the Windows operating system, to construct a TCP server. Both the client and server use the WebSocket protocol to ensure proper communication.
I built a small server using the System.Net.Sockets library, which includes simple methods to start the server service and respond to data sent from the client. As a visual representation, every time the client sends a message, the server makes a circle in the game scene grow larger. In another Unity project, I set up the client program using the NativeSocket plugin. I also placed a button in the game scene that, when clicked after establishing a successful connection with the server, sends a message to the server. After completing the development of both the server and client parts, I set the server's target platform as Windows and the client's target platform as WebGL. I used Unity's built-in WebGL debugging tool to run the client program for local testing on the same computer. I successfully observed that the client can send messages to the server, and the server responds accordingly in the game. This confirms the feasibility of this approach.
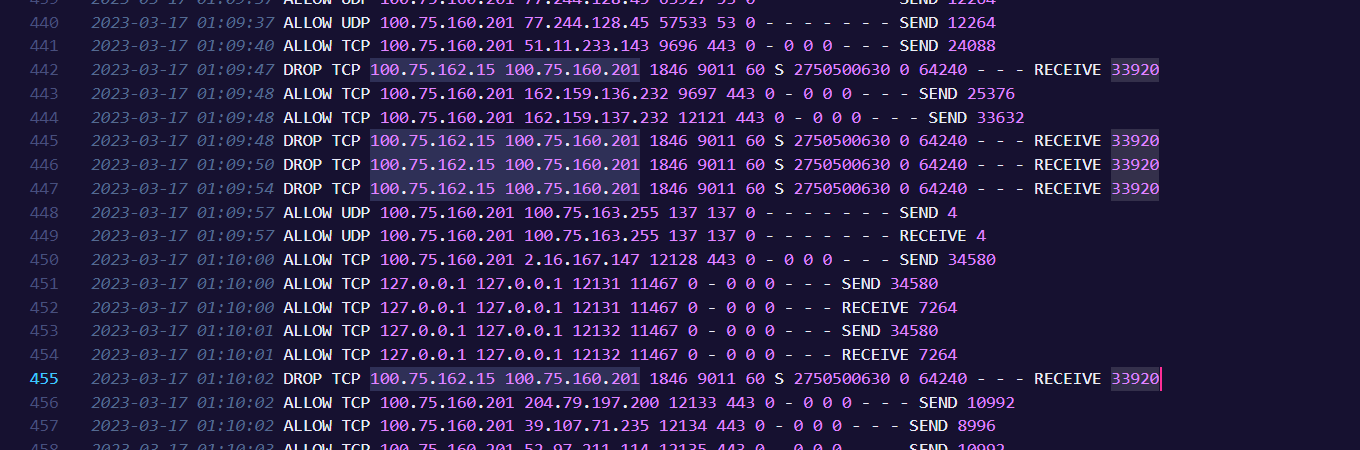
An issue I encountered during the development process. Data transmission from the client to the server was not successful. It is recorded in the logs that even though it identified the open port, the data packets were being dropped, preventing communication. Later, It is discovered that this was because the server was not discoverable and placed in a private network.
Mid-term Development Work
After completing the feasibility analysis, we moved on to the actual development process. First, we realized that if we wanted to deploy the client to a webpage, we needed to build a webpage. This was unfamiliar field for both me and the another programmer. Initially, I considered using the Vue.js framework to build the webpage and utilize server services to deploy it. However, this approach turned out to be impractical. Renting a server incurred additional costs and raised security concerns. Moreover, it would be challenging to maintain the server after the project done, making it an unsustainable solution.
This led us to another idea - security. Niamh, who was one of our artiest, was the first to bring it up, highlighting the importance of considering security since our game would be in a public area and involve network connections. I found this idea constructive and reasonable, prompting me to further contemplate and make decisions. I decided to confine all communication services within the local network.
Considering that the computer connected to the Aberdeen Music Hall is usually kept running, I chose to use it as the server and deploy the client on that computer. By using the local network, players could connect their smartphones to the server through the router, eliminating the need to expose the program and IP address to the public internet. This approach bypassed the complexities of port forwarding and avoided the need for additional tools and expenses. It also ensured that players could only access the game by scanning the QR code on-site, guaranteeing both security and localized communication within the same network segment.
Therefore, my took the method that use the built-in IIS (Internet Information Service) in Windows to create a webpage on the computer. To access the webpage, the computer needed to be discoverable by other devices within the dedicated network and have the corresponding port open. Once the compiled client program was deployed on the webpage, users could open the application by entering the computer's IP address and the corresponding open port on their smartphone web browser. Afterward, when they clicked the button on their phone, the server on the computer successfully responded. The foundational network framework was thus established.
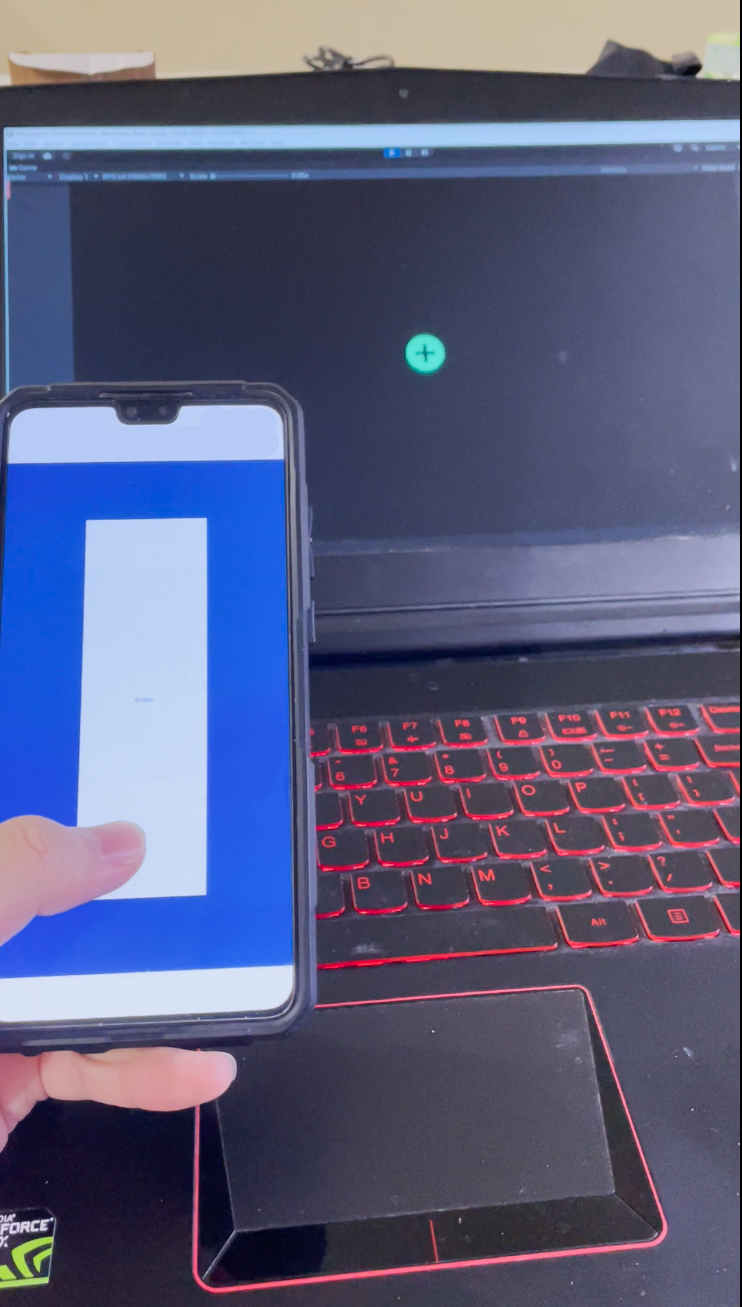
The circle on computer’s screen will respond when pressing button on phone.
After completing the network foundation, another programmer, who is responsible for the gameplay, also finished building the basic framework of the game. Once we merged our respective work together, we were able to seamlessly control the game remotely using our smartphones. Additionally, I used tool online to generate a QR code that aligns with the game's atmosphere.
Afterward, as the game functionality continued to improve, I needed to constantly expand the server's computing methods. Since our game is not installed on multiple players' smartphones but only runs on a single computer, I don't need operations like ClientRpc for client-state synchronization. The client acts solely as a game controller and doesn't require any computation. Instead, all calculations are performed on the server. I need to implement different operations on the server, such as distinguishing inputs from two different players, switching game modes, and automatically disconnecting idle connections.
When the game supports single-player mode, I enable the server to handle basic game inputs. When the client clicks a button and sends a message, the server receives it and simulates the Unity InputSystem to provide input to the game, thereby affecting the gameplay. Players can directly see on their screens whether they successfully hit the target circle.
For multiplayer mode, I completed a series of tasks. First, I limited the maximum number of client connections to 2 because our game has a PVP mode with two players competing equally. If a third person tries to join the game, they will be automatically disconnected and denied access until a slot becomes available.
Next, when a player joins the game, the client automatically assigns a player position to each connected ClientID. Drawing on my previous experience in hardware programming, I utilized a bitmasking technique commonly used in hardware programming to enable the corresponding ports. By performing binary operations, I set a two-bit binary number where the first bit represents Player 1 and the second bit represents Player 2. If a position has a connected player, the corresponding number becomes 1, indicating that the position is occupied. When a new player joins, they are automatically assigned to an unoccupied position with a number 0, prioritizing Player 1 and then Player 2. For example, "01" represents one player currently in the game, and they are Player 1. If another player joins, it becomes "11". When a player leaves, the corresponding position is automatically released. If Player 1 exits the game, the number becomes "10". If Player 2 remains in the game, they will continue as Player 2. This approach prevents frequent switching of Player 1 and Player 2 positions during a single game session, avoiding confusion. Moreover, if there is a need to expand the number of players in the future, it can be easily achieved by adding more bits, ensuring scalability.
Afterward, I implemented a timeout feature for automatic game exit. In the client program, in addition to the "Press" button for communicating with the server, I also added a "Quit" button for players to exit the game. However, to prevent players from forgetting to quit or leaving without successfully exiting the game, the server automatically disconnects players who have been idle for a certain period of time. The specific method involves assigning a timer to each client ID when they connect to the server. The timer starts counting from 0, and if the corresponding client performs a data-sending operation, the timer resets to zero. If the timer reaches the set time limit, the server kicks out the client associated with that timer. When a player exits the game, whether voluntarily or due to being kicked out by the server, the corresponding timer for that client is deleted.
Additionally, when a player joins the game, the server program does not allow polling checks in the Update function. To improve efficiency, I adopted a technique commonly used in hardware programming: interrupts. Each time a connection is established or closed, a method is invoked to check the current number of connected clients. Based on the current number of connections (0, 1, or 2), the game enters Idle Mode, Single Player Mode (PVE mode), or PVP mode, respectively. The server automatically calls the corresponding mode's Setup method to switch game modes.
Finally, in addition to Idle Mode, Single Player Mode, and PVP mode, the game also has a Play Again Mode that checks if both players want to continue playing after completing a multiplayer round. When both players click the "Press" button, the server receives the signal and the game proceeds to the next round of multiplayer play. For players who don't want to continue playing, they can simply click "Quit" on their devices and leave. The game then automatically exits the Play Again Mode and PVP mode, allowing the other player to continue in Single Player mode until another player joins the game or they also exit the game.
Unlike the server development, which requires collaboration with another programmer and other artists and designer for development, the client-side content was entirely completed by me alone.
In the initial version of the client, although it met the minimum requirements for playing the game, the interface was not visually appealing, and there was no feedback upon clicking. If players didn't pay attention to the position of their fingers on the phone while playing, they might deviate from the original position. However, I completely redesigned the client's interface and some of the code in a later version. Firstly, I made the interface more visually appealing, and when players clicked the center button, it produced a smooth animation effect. A circle would gradually expand from the center to the entire screen and then disappear. This way, even if players were focused on the large screen, they would perceive through their peripheral vision that their fingers successfully pressed the button. Additionally, I improved the client's functionality. As mentioned before, since players of various age groups would be playing the game, I aimed to make the game's controls as simple as possible. In the new version of the client, although there appears to be only one "Press" button for gameplay, this button has three different effects based on the timing of the press:
- When players open the game for the first time, the client does not automatically connect to the server. At this point, if players click the "Press" button, the client will attempt to establish a connection with the server. This approach prevents first-time players from seeing sudden changes on the big screen as soon as they open the game, which could make them feel flustered and unsure of what to do. When they observe something on their own phones and click the "Press" button out of curiosity, the game provides feedback, and players realize that this button can interact with the game on the distant screen.
- After players successfully establish a connection with the game, clicking the "Press" button sends a message to the server, triggering a response from the game. Players interact with the game through this mechanism.
- After completing a round of multiplayer gameplay, the game enters the "Play Again Mode" and asks both players if they want to proceed to the next round. At this point, clicking the "Press" button signifies "confirmation." When both players have confirmed, the game moves on to the next round of multiplayer play, and the "Press" button switches back to Mode 2.
- Players can click "Quit" at any time to exit the game. The button doesn't become disabled but instead returns to Mode 1. Clicking the "Press" button again will attempt to join the game once more.
These operations are intuitive and easy for players to grasp, allowing even those who are not good at gaming to complete the entire game based on their instincts.
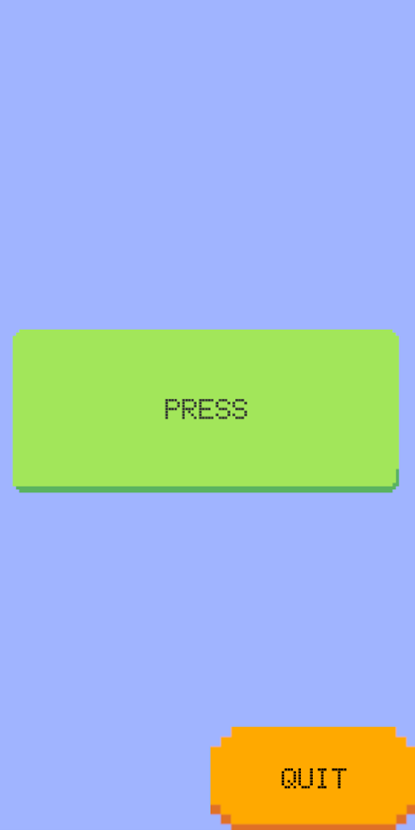

Previous client screen and the current client screen
Late-stage Iteration and Testing
In subsequent iterations, our designer proposed new requirements based on the feedback from the eleventh week. We needed to display on the client-side whether the player was assigned as Player1 or Player2. This required the client to send a message to the server, which would then process it and send a response back to the client. Although this feature wasn't difficult, a major issue arose. For the WebSocket protocol, data needs to be encapsulated in the format of
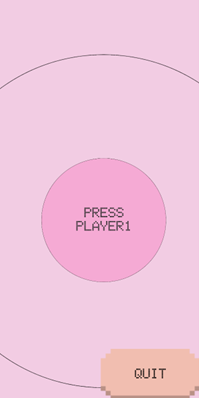
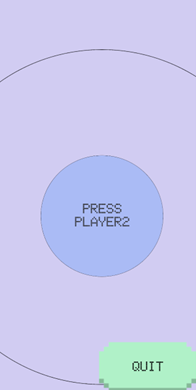
Player1 client screen and Player2 client screen
Most of the game testing was completed by myself on my own computer, and the program ran smoothly. In the later stages of the project, when we believed the timing was right, we arranged another trip to Aberdeen Music Hall for testing. However, this testing attempt was not successful as I encountered issues that I had never encountered before while deploying the client to the website on the computer connected to the music hall's big screen. This halted the testing for that time. The another programmer in our team suggested that we find a completely new computer for testing to eliminate any potential issues. We couldn't use computers from library for testing because changing network configurations required administrator privileges. He took me to the Hack room, where we could use regular computers for testing. We encountered the same problem while testing in the Hack room, but he helped me resolve the issue and documented the solution. When we planned another trip to Aberdeen Music Hall for testing, our client suggested that we send him the program so he could test it on his own computer. So I wrote an Instruction document, and asked the another programmer and artist in our team to review the instruction document and test if non-technical individuals could successfully configure the network and conduct testing based on the document. The result was positive, and we sent both the document and the program to Mark for testing. However, it seems that time was already too late, and we did not receive a timely response.